Split Keyboard Mk. I
 This is my very first split keyboard build ever, and while it’s far from perfect, it was an amazing learning experience.
Disclaimer:
This DIY split keyboard PCB was designed for personal use and is shared as-is. While it works well for me, it’s not a professionally validated design—there may be imperfections or quirks. If you decide to build it, please do so at your own risk. Double-check everything, and make modifications as needed. Happy building!
Instructions
Specs
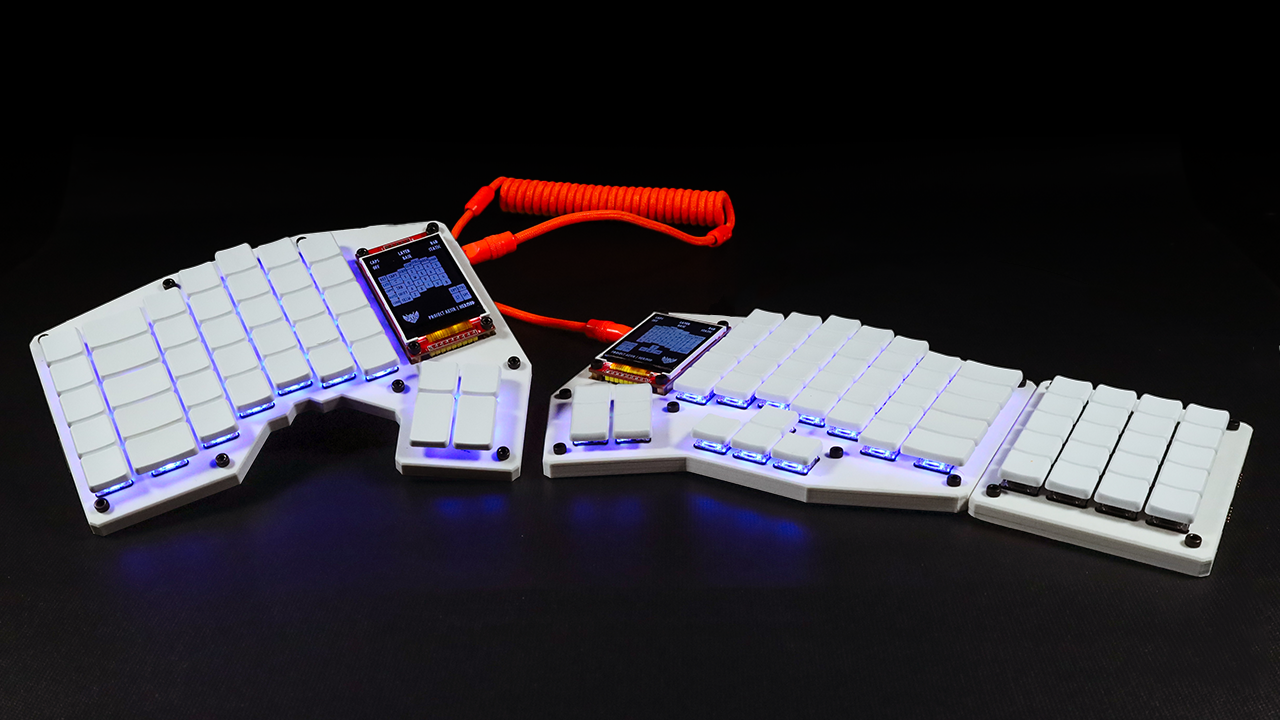
- Split, Columnar Staggered Layout
- 2x1.5u and 2x1u Thumb Keys per side
- Magnetically Detachable Numpad
- STM23F072CBT6 MCU
- Kailh Choc Brown Switches
- Two 2.2” LCD’s
- Per-Key RGB Lighting
Inspiration
The inspiration for this build came from two other keyboards, and I wanted to make sure to give credit early and often!
- Tzarc Djinn Rev2
- The 2.2” displays instantly struck a cord in me and I knew I had to find a way to incorporate them into this design.
- Also Tzarc directly helped me get this board working on Discord, so again, huge shoutout to him!
- ZSA Voyager
- The overall look and feel of my keyboard was largely influenced by the ZSA voyager, with it’s low profile choc switches, per-key RGB lighting and thumb clusters. If I hadn’t had the insane idea to build my own keyboard from scratch, I would have bought the voyager.
Post-mortem
Mistakes
- No 5.1kΩ resistor on the Split USB Communication lines
- This meant the two halves literally couldn’t communicate
- Fixed by soldering an SMD 5.1kΩ resistor to the USB port pins and bridging with solder
- Pin selection was sub-par
- Not necessarily a mistake, but it make the firmware much harder to write.
Pros
- Absolutely Love the arrow keys being tucked in under my right palm. I never accidentally press them and they are always right there, easy to access when I need them.
- The thumb clusters are awesome, having quicker access to Cmd, Ctrl, Layer changes, and other custom behavior with my thumbs has resulted in a huge productivity boost!
- The 2.2” displays are amazing. I don’t have any legends on my keycaps, so having a place to quickly determine which key is where at a glance is super handy.
- The magnetically detachable numpad is great for when I’m at my desk and find myself needing to type lots of numbers, but if I’m on the road or a smaller desk, I can pop it off and free up some real estate.
- Also, being able to add another numpad to the other side of my keyboard and map it to more custom macros is a huge bonus!
Cons
- The STM32F072 was a poor choice.
- It’s a good choice for entry level boards, but this board required too much from it. A beefier MCU would have been very handy when it came to time to write the firmware.
- I am experimenting with the STM32G474CETx - Datasheet Here
- Thumb clusters are a little too far away from my other fingers
- Not quite my thumbs natural resting position, so sometimes I feel like I’m manually holding my thumbs out too much.
- Didn’t use a “handedness” pin
- This means I have to compile and flash separate firmwares for Left/Right
Resources
Absolute TOP resources:
- Keyboard Layout Editor
- Keyboard Atelier
- QMK Firmware, QMK Discord
- Noah Kiser’s STM32F072 Template
- AIO3 Plate Generator
- KBPlacer Plugin for KiCAD
Everything else
Below is a list of every single link I saved during the building of this keyboard. It might not be complete, and it might actually be a little bit overwhelming, but they were each helpful to me in some way, so I figured better safe than sorry and included them all!
- https://github.com/ruiqimao/keyboard-pcb-guide?tab=readme-ov-file#setting-up
- https://github.com/tmk/kicad_lib_tmk
- https://github.com/tmk/keyboard_parts.pretty
- https://github.com/egladman/keebs.prettyhttps://www.reddit.com/r/MechanicalKeyboards/comments/5nzpd2/guide_how_to_make_your_own_keyboard_pcb/
- https://i.imgur.com/ajqxJWz.png
- https://www.youtube.com/watch?v=7azQkSu0m_U
- https://www.youtube.com/watch?v=iznKltVU1yw
- https://www.youtube.com/watch?v=kGKN8SGkUD0
- https://github.com/Zambumon/SKUF
- https://maxkeyboard.com/ansi-layout-custom-color-cherry-mx-keycap-set.html
- https://yuzukeycaps.com/
- https://amzn.to/3XczB5T
- https://keyboard-tools.xyz/
- https://docs.qmk.fm/custom_quantum_functions
- https://github.com/getreuer/qmk-keymap?tab=readme-ov-file
- https://plate.keeb.io/https://discord.com/channels/728571839529353216/1040846204856193154/1040846268945145866
- https://hackaday.com/2023/08/07/all-about-usb-c-example-circuits/
- https://github.com/daprice/keyswitches.pretty?tab=readme-ov-file
- https://kicanvas.org/
- https://www.etsy.com/listing/549370705/custom-sublimation-transfers-sizes-up-to?ref=yr_purchases
- https://github.com/Maximillian/keycap-set-templates?tab=readme-ov-file
- https://www.reddit.com/r/olkb/comments/1bvyo0j/oled_screen_wont_work_qmk/
- https://github.com/kitspace/awesome-electronics
- https://blog.keeb.io/getting-the-iris-ce-compact-edition-ready-for-you/